Showing posts with label free pattern. Show all posts

Monday, December 19, 2022

Snowmageddon 2022 Week 4


In Which We Are Done Snowing!


It's been a long month, but the snowflakes are all completed!!!

The Entire Snowstorm pre-ironing

post ironing and starching

Some details

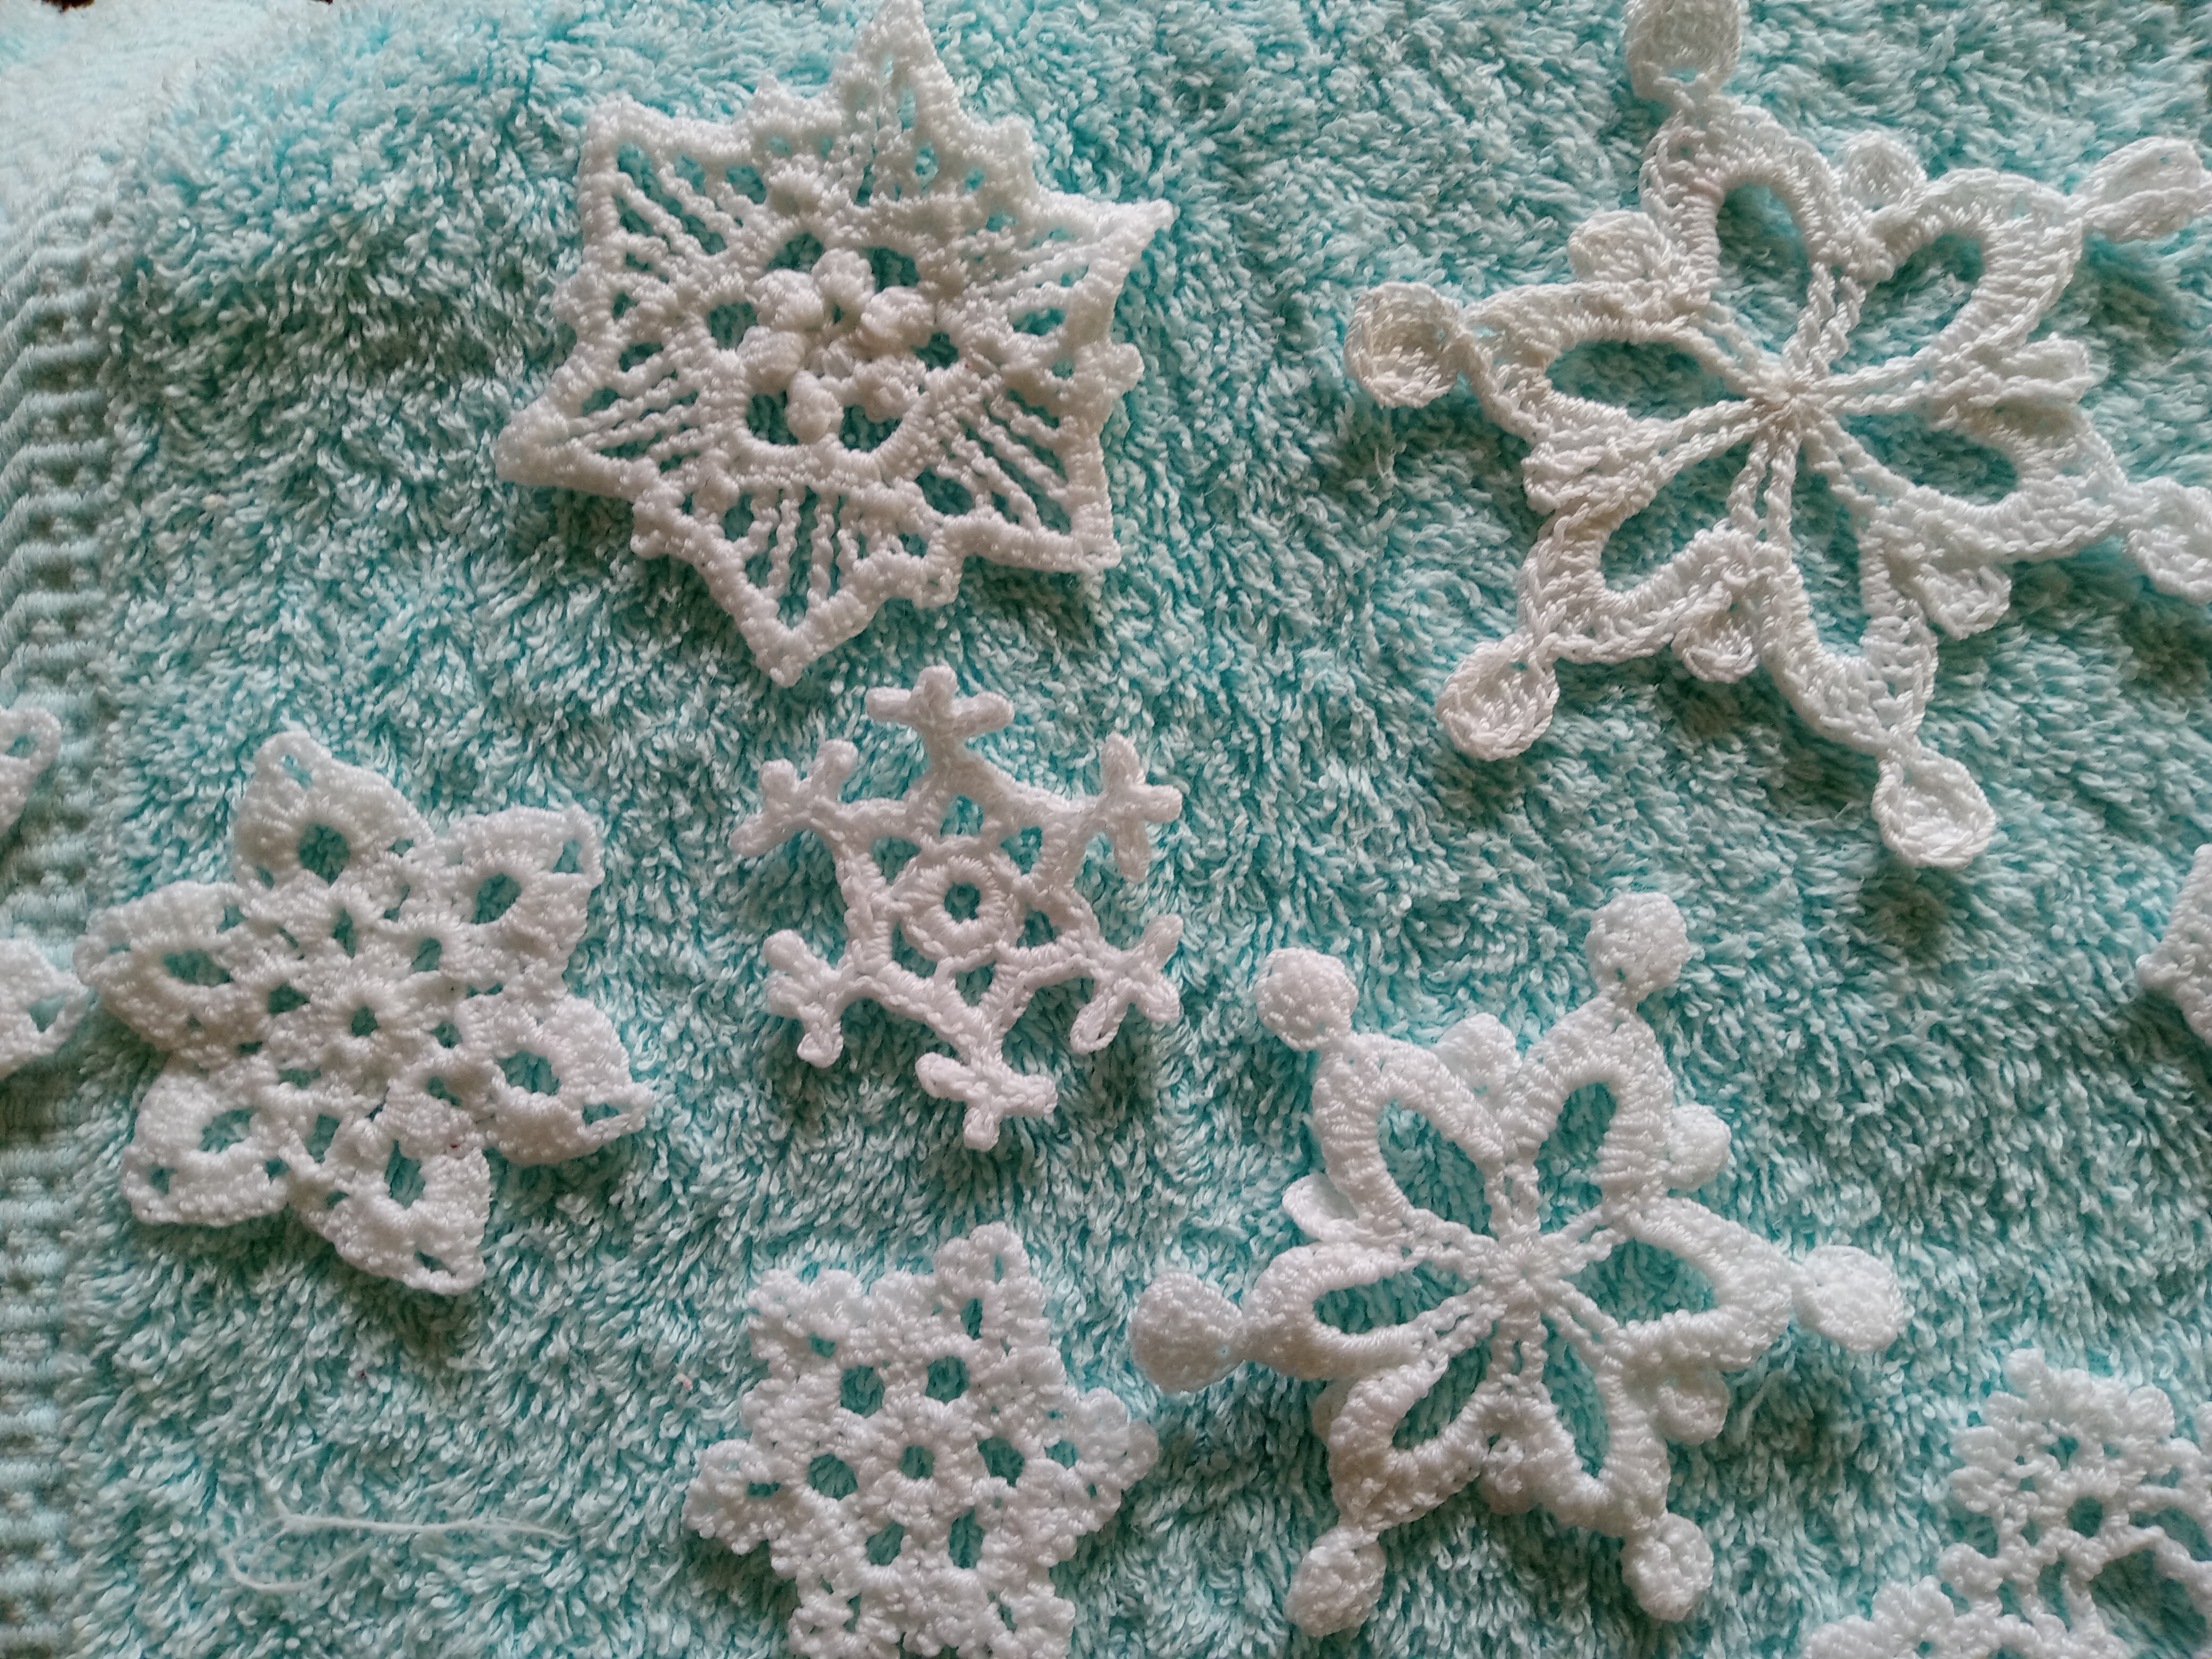
Some took their blocking really well!

In fact, I'd be tempted to say that these are some of my best work yet!

Some of them are very loopy

And I cannot get over the crisp lines on some of these!


Since today's pics are of flakes you've already heard me talk about in the last 3 weeks, I also wanted to show you guys something you can make in a day!

The Lilac Set - purse (top) and headband (bottom)

These were made with an H (5mm) hook and worsted weight yarn using an alternating granny block/v-stitch pattern.

Basically, the headband is a long rectangle of repeated rows of 3x blocks and v-stitches, sewn together at the ends. If you want it to be twisted, then you just twist it before sewing the ends.


It is wide so it can cover more surface earea. That's not a typo.

The purse, meanwhile, is a wider base of the same pattern repeats. Go until you've got the height of the front of the purse, then do your next row in the back loops only of the stitches to make a fold point. Finish the same amount of rows you just did, then do another row in either the back or front loops (whichever would make your piece flop over on itself) to form the top flap. When you've got a few rows done, switch to single crochet, but instead of turning at the end of the row, turn the work and start working in the side of the crochet - we're both edging the piece and stitching it shut! Fold your purse shut, then single crochet all the way down one side, slip stitch along the bottom, and single crochet back up the other side. When you get to the start of the first round of single crochet, slip stitch, then chain one. Single crochet almost halfway across the flap, chain two to form a button hole, then finish chaining the row. Slip stitch your way down the side until you reach the opening, then slip stitch around the opening and up the other side of the purse. When you reach the top, slip stitch, chain one, and then single crochet all the way across, including the button hole, and slip stitching once into the first slip stitch of the previous round. Tie off, weave in your ends.

After you've got the body of the purse, you can think about making a strap for it (and a button in my case). To make a strap, I just made a chain of 4ch, then hdc in the second ch from the hook and hdc across, turn, ch1, repeat rows of hdc until it's long enough, then sew to the top of the bag.

To make a button, find some sturdy yarn and use a much, much smaller hook than you think you need. I used a C/2.75mm hook for my button. From there it's just making a magic circle, sc6 into the circle, tighten the ring, sl st to the first st, ch1, 2sc around (12sc). Then you tie it off, sewing the long tail until it gets back to the center of the ring and use that to sew it into place!


Sometimes my new phone likes to switch between horizontal & vertical shots
and I haven't quite learned how to change its mind on those...

So that's this week's crochet work! I'm still trying to finish up my projects, but I think it'll go pretty well from here.

How are all your guys' craft projects going? Get anything fun done lately?

That'll do it from me - gotta finish making stuff lol!

Go Enjoy Something!
FC

Monday, August 29, 2022

Fiber Monday


In Which I Have Speedy Little Updates


This week has been... a lot.

It hasn't been bad, don't get me wrong. I've been fairly productive by my standards and nothing tragic has befallen me, but boy has there been more activity than I'm used to.

I'll probably get more into it tomorrow, but for now I'll just say this:

Boiled frosting is hard to make.
Spiders don't care how hard it is for you to sleep when they're over your head.
Scrap Yarn is just another opportunity.
Gordian Knots can be unraveled without cutting them (or at least, I'm pretty sure they can)
Good friends are the best.

For today, however, I'll just talk about the Yarn and the Knot!


Behold The Goblin's Purse!

Last night, I was listening to some music and trying to avoid a spider on my ceiling, so I decided to use up a tiny amount of blue thread I had leftover from a long while ago! I started my pouch based off this Treasure Pouch Pattern by Pahavit's Universe, but I had misread what kind of thread they were using, and they were using a Size 3 thread for their 2.25mm hook and I was using the 2.25mm hook on a 10 weight thread.

This meant that when I reached the recommended stitch-count circumference, my pouch was... itty-bitty. We're talking "won't fit over an American Girl Doll's hand" small. The pouch I ended up with is small, make no mistake, but it's at least large enough to hold a small handful of coins, some shiny rocks, or whatever other minor detritus you might scoop up on a walk if you, like me, are a cross between a crow and a goblin creature, hence why I'm calling it The Goblin Purse.

R1: Make a magic ring, then sc 6 stitches into the ring, close it. Do not turn work, do not chain. Work in continuous spiral rounds. (6sc)

R2: 2sc in each sc around (12sc)

R3: (2sc in next sc, sc in next sc) around (18sc)

R4: (sc in next sc, 2sc in next sc, sc in next sc) around (24sc)

R5: (2sc in next sc, sc in each of next 3 sc) around (30sc)

R6: (sc in each of next 2 sc, 2sc in next sc, sc in each of next 2 sc) around (36sc)

R7: (2sc in next sc, sc in each of next 5 sc) around (42sc)

R8: (sc in each of next 3 sc, 2sc in next sc, sc in each of next 3 sc) around (48sc)

R9: (2sc in next sc, sc in each of next 7 sc) around (54sc)

R10: (sc in each of next 4 sc, 2sc in next sc, sc in each of next 4 sc) around (60sc)

R11-25: sc in each sc around (60sc/round 900sc total)

At this point you can either continue adding rounds in 60sc increments or do what I did and finish it off. I chose to finish mine in a crab stitch, which is, as best as I can describe, a single crochet, but backwards? There are other people who can describe how to do this stitch. I am not one of them. You can finish it however you like! Remember to weave in your tails!

To make the bag cinch shut, you take two strands of thread or cord and sew them through the top of the bag to make a drawstring. Then tie the ends. I put my threads over two stitches and then under two stitches around.

After you have your drawstring in, if you want to add the little wrist strap that I have on there, you just find the opposite side of your bag from where the drawstring comes out, and put your hook through the holes to either side of an sc. Then attach your thread and chain as many chains as it takes to get your hand through, slip stitching back into the same stitch you chose. If my instructions aren't clear enough, I 100% understand, and it's absolutely fine to, say, make a loop of chain stitches that your hand fits through, and then sew that to the back of the bag. You can even add a cute button or bead to hide your sewing!

At this point, you have a fun little goblin bag to take out adventuring with you! If you make one of these, feel free to @ me on Twitter with pics of the bag and any trinkets you collect in it! I'm hoping to take it out for a spin maybe tomorrow or Wednesday :)


Now, as for the Gordian Knot I mentioned...

You see, I have a tangle of yarn that has become a bit of a recurring character here on the blog, and its name is Gordon. Gordon is a large quantity of what I think is a DK weight acrylic yarn. I have had it for years and never have I ever been able to detangle it.

This week, however, I've really been working hard on him and...

I think we're getting close!

Gordon has gone from being a pile of yarn that pooled to a width that dangled over my tv tray or totally filled a 12" cube to a ball the size of a very large cantaloupe, a tangle the size of a grapefruit, and after finally locating his other end, a small pile of spaghetti in a paper bag.


Not a particularly overlarge paper bag, either.

So I'm thinking that this is Gordon's last week as a mess. Next week, he'll be one ball. And after that? Well... I don't know, but he's kinda scratchy, so maybe he's not going to become anything that'd touch skin. I would like to use my 3.75mm hook on him, so I'll go hunting on Ravelry or elsewhere on the interwebs. If you have any suggestions for what appears to be approximately an entire mile of primary blue yarn in about a DK weight, I'd love to hear from ya!

I think that'll about do it from me tonight. I'm tuckered out, and I hope you appreciated the linked and free patterns!

Go Enjoy Something!
FC

Monday, November 22, 2021

Fiber Monday

 
In Which I Have Had A Bear Of A Time lol


Yes, I am late again. No I have no regrets. I have been working very hard on a way to make a ribbed bottom lid for this project that didn't involve 1) overabundant rippling, 2) single crochet ribbing like on a cuff, and/or 3) too much math.

It took... an embarrassingly long time.

Like until literally 45 minutes ago.

But here is what we have so far!

Looks kind of like a jar from this angle!

A hinge?

A closer look at the hinge/freestanding crochet.


My first... bad attempt at a lid!


The Current, Much Better Lid!

Here is the pattern from start to current:

Round 1: sc 6 into magic ring (6 sc)
R2: 2sc around (12 sc)
R3: [2sc, sc] around (18 sc)
R4: [sc, 2sc, sc] (24 sc)
R5: [2sc, sc in next 3 sts] (30 sc)
R6: sc around (30 sc)
R7: [sc in next 2 sts, 2sc, sc in next 2 sts] around (36 sc)
R8: [2sc, sc in next 5 sts] around (42 sc)
R9: [sc in next 3 sts, 2sc, sc in next 3 sts] around (48 sc)
R10: [2sc, sc in next 7 sts] around (54 sts)
R11: [sc in next 4 sts, 2sc, sc in next 4 sts] around (60 sc)
R12-13: sc around (60 sc)
R14: [2sc, sc in next 9 sts] around (66 sc)
R15: [sc in next 5 sts, 2sc, sc in next 5 sts] around (72 sc)
R16: [2sc, sc in next 11 sts] around (78 sc)
R17: [sc in next 6 sts, 2sc, sc in next 6 sts] around (84 sc)
R18: [2sc, sc in next 13 sts] around (90 sc)
R19-21: sc around (90 sc)
R22: [sc in next 7 sts, 2sc, sc in next 7 sts] around (96 sc)
R23: [2sc, sc in next 15 sts] around (102 sc)
R24: [sc in next 8 sts, 2sc, sc in next 8 sts] around (108 sc)
R25: [2sc, sc in next 17 sts] around (114 sc)
R26: [sc in next 9 sts, 2sc, sc in next 9 sts] around (120 sc)
R27-30: sc around (120 sc)
R31: [2sc, sc in next 19 sts] around (126 sc)
R32: [sc in next 10 sts, 2sc, sc in next 10 sts] around (132 sc)
R33: [2sc, sc in next 21 sts] around (138 sc)
R34: [sc in next 11 sts, 2sc, sc in next 11 sts] around (144 sc)
R35: [2sc, sc in next 23 sts] around (150 sc)
R36-40: sc around (150 sc)
R41: [sc 2 together, sc 23] around (144 sc)
R42-47: sc around (144 sc)
R48: [sc 11, sc 2 together, sc 11] around (138 sc)
R49-55: sc around (138 sc)
R56: [sc 2 together, sc 21] around (132 sc)
R57-64: sc around (132sc)
R65: [sc 10, sc 2 tog, sc 10] around (126 sc)
R66-74: sc around (126 sc)
R75: [sc 2 tog, sc 19] around (120 sc)
R76-84: sc around (120 sc)
R85: sc around, sl st to first sc (120 sc)

R86: ch3 (counts as 1st dc), dc in each sc around, sl st in top of ch3 (120 sc)
R87: ch3 (counts as 1st dc), dc in next 10 dc; yarn over, insert hook into next dc, pull through 1 loop, yarn over, pull through 2 loops, yarn over, pull through 2 loops (does not count as 1st foundation dc), foundation dc next 96 stitches, then (being careful not to twist) dc in the 12th dc from the end of the round, dc to the end of the round (24 dc, 96 foundation dc = 120 dc); sl st to top of ch3, fasten off.

You should now have something that looks like a hinged ring or a handle attached to an odd, pear-shaped pouch. Now we’ll begin the underside of the lid (this is going to be weird, I’m sorry).

Form a magic ring from the same color as you’ve been using. I use a double-magic-ring for added security but you can start this in the round however you like.

R1: ch3 (counts as 1st dc here and throughout), dc 11 in ring, sl st to the top of the ch3 (12dc)
R2: ch3, fpdc in same dc, (dc in next dc, fpdc in same dc) around, sl st to top of ch3 (12dc, 12fpdc = 24st)
R3: ch3, dc in next st, fpdc in fpdc (dc in next 2 st, fpdc in fpdc) around, sl st to top of ch3 (24dc, 12fpdc = 36st)
R4: ch3, dc in next 2 sts, fpdc in fpdc (dc in next 3 sts, fpdc in fpdc) around, sl st to top of ch3 (36dc, 12fpdc = 48st)
R5: ch3, dc in next 3 sts, fpdc in fpdc (dc in next 4 sts, fpdc in fpdc) around, sl st to top of ch3 (48dc, 12fpdc = 60st)
R6: ch3, dc in next 4 sts, fpdc in fpdc (dc in next 5 sts, fpdc in fpdc) around, sl st to top of ch3 (60dc, 12fpdc = 72st)
R7: ch3, dc in next 5 sts, fpdc in fpdc (dc in next 6 sts, fpdc in fpdc) around, sl st to top of ch3 (72dc, 12fpdc = 84st)
R8: ch3, dc in next 6 sts, fpdc in fpdc (dc in next 7 sts, fpdc in fpdc) around, sl st to top of ch3 (84dc, 12fpdc = 96st)
R9: ch3, dc in next 7 sts, fpdc in fpdc (dc in next 8 sts, fpdc in fpdc) around, sl st to top of ch3 (96dc, 12fpdc = 108st)
R10: ch3, dc in next 8 sts, fpdc in fpdc (dc in next 9 sts, fpdc in fpdc) around, sl st to top of ch3 (108dc, 12fpdc = 120st)

This takes us to the 120 stitches necessary to attach this ribbed bottom-lid to our weird hinge/handle-looking flap bit next week!

Any guesses as to what we're making yet?

I'm really looking forward to the next few bits, since they should fly along (I'm hoping I can manage the math so it's not as big an issue lol), and soon we'll be introducing a second color!!!

I mean... you could do this as a monochrome, but I don't see why you'd want to...

You may have seen my twitter grumblings earlier today about this lid, by the way. I have struggled with this thing! I had no idea how to do it and it took several tutorials for different spoked-wheel-shaped things for me to wrap my head around it. The final tutorial I followed was what gave me the actual repetitions for the spokes, and it's the Knit-A-Square Wheel Spoke Square pattern! I just extrapolated what a bigger center for that square would look like and made the whole lid be that basic pattern!

That being said, I totally frogged that stupid lid about 30 times before I found that pattern and I was just about emotionally finished with this project lol. Thankfully it worked the way I wanted it to, and we'll continue next week!

Good luck out there everyone, and - 

Go Enjoy Something!!!
FC

Monday, December 7, 2020

Fiber Monday: Cozy and Scrappy


In Which I Made A Thing


I have probably annoyed you all at this point with my repeated harping on my recent descent into tea drinking, but here's the thing...

It's getting cold, and I hate cold tea that isn't supposed to be cold.

Solution: Tea Cozy!

But there's one other problem - my teapot has a vertical handle, and 99% of the patterns I've found for tea cozies are for pots with handles on the side, not the top. 100% of the vertical-handle patterns I did find and could read needed money, which I respect, but could not afford at the time!

New Solution: Make my own pattern!

So I now present to you - possibly the ugliest tea cozy on earth.

Made with leftover yarn I cannot identify


Here is the free version of the pattern:

TEA COZY

MATERIALS

  • Yarn (any size – pretty sure mine was DK/Light/3)

  • Hook (I used a 3mm)

  • Yarn needle

  • A ribbon or other closure (optional)


STITCHES (US TERMS)

ch = chain

sl st = slip stitch

sc = single crochet

hdc = half double crochet

dc = double crochet


INSTRUCTIONS

START: Ch as long as you need to go around the narrow bottom of your teapot, sl st to first chain to form a loop, trying not to twist. I needed 90 chains – yours may be different depending on hook, yarn, and teapot!


Round 1: Ch1, sc in each ch, sl st to first sc

Round 2-?: Ch1, increase around evenly (so if you have 90 ch, you sc in the next 14 sc, then sc twice in the next sc, repeat around), sl st to first sc of each round, ch1 to start the next.


When your sc increase rounds reach the bottom bulge of your spout, we’ll switch from crocheting in the round to crocheting in alternating rows!


Remember to fit to your teapot constantly so that you don’t get any nasty surprises at the end like “oops, too small, no cozy for you!”


Pattern Rows

Row 1: ch1, sc across

Row 2: ch 1, turn, sc in first sc, then alternate dc and sc stitches around, making sure the dc stitches pucker outwards like a bobble or popcorn stitch! My pattern was sc in first sc, *dc in next, sc in next 2 st repeat from * until last 2 stitches, then dc, end with sc. You may want to have more or less sc stitches between your dc stitches, depending on how wide your rows are.

Row 3: ch 1, turn, sc across

Row 4: ch 1, turn, hdc across

Row 5: ch 2, turn, dc across

Row 6: ch 1, turn, hdc across

Row 7: ch 1, turn, sc across

Repeat from Row 2 until you pass the top of where your spout attaches to the pot


When you pass the top of your spout, sl st in to the first stitch to resume crocheting in the round. Repeat the pattern rows until you reach the top of your pot, hopefully ending on a Row 5, 6, or 7 repeat so you can use that for your ribbon.


When you’re done, just tie it off and weave in the ends.


If you don’t have a spare ribbon or cotton strip laying around, you can, of course, make one by crocheting a long chain in the same yarn or one that would look nice with it and tying that off, weaving in the ends, and using that as a cinching tie. I prefer my cotton ribbon because it isn’t stretchy.


You should have a nice sweater for your teapot now!


Go Enjoy Something!