Showing posts with label cotton. Show all posts

Monday, July 31, 2023

Fiber Monday


In Which I... Didn't do much today...


So I promise, I made progress since last week on my pouch! It's just.... not a ton.

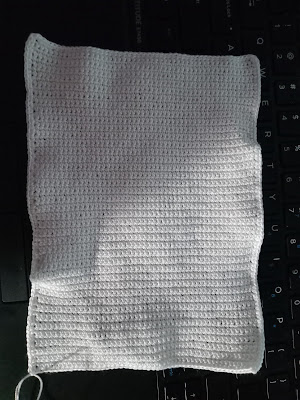
The front panel is now finished, at least.

I even did a border around it to round the bottom corners and even things up.

A rectangular panel with rounded corners at the top. It is crocheted with white thread in single crochet, including a white thread border of single crochets.
Sure, it's upside down, but it's done!

The panel itself is 50 stitches across by 80 rows, plus three sides bordered in single crochet with 3sc in each corner and one stitch per stitch or row. This means that the gusset, which will be 10 stitches across, will need to be about... 212 rows? Thereabouts? And the back & flap section will need to be about... 115/120 rows? Plus a button hole? I'll know more later, when I've finished all three parts. Then I'll make some sort of strapping system (probably starting with a pair of 5 stitch wide loops to put belts/straps through)

After all three panels (front, back, gusset) and the loops are finished, I'll stain them brown somehow and then sew on the leaf detail on the flap and sew all three panels & loops together. Hopefully it works.

If it doesn't, I'll make a shoulder strap and it'll be a purse.

One way or another, this will be finished by the end of the coming month. It has to be lol.

There are other projects I'm working on, but they're secondary.

I think that'll do it for tonight!

I hope you're all working on creative things and they're all going well!

Go Enjoy Something!
FC

Monday, July 24, 2023

Fiber Monday

In Which Slow Progress Is Still Progress


I am typing this from a room that is only now coming down from about 90℉(32,2℃). It was so hot today. Ironically, the day I hung out at a lake with my family was quite comfy, but today was hot and unpleasant. At least it's not as humid today as it was last week. We didn't use the AC.

Understandably, most of my progress was made at the lake, not at home.

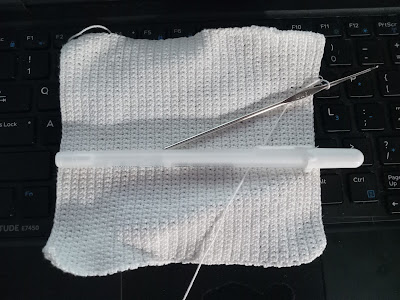
A crocheted rectangle lying on its side. The white thread it's made from is hanging out at the top left corner and from the middle of the right side. The steel hook is still attached, and there is a white gel pen laying across the middle horizontally for scale.
As you can see, it's getting bigger!

Again, this is eventually going to be a pocket that will be dyed more earthy-tones. I've also made several test squares - 10sc x 10 rows - which I'll experiment with using various dye matter. Maybe the winner will be iron, maybe it will be coffee, possibly tea.

Maybe I'll just dip dye each panel of the pocket into tea, then coffee, then iron? Who knows.

All I know is that I want it brown, but I don't have any brown thread.

I have brown yarn, so if I cannot get the pouch to look right, I'll just use that.

But uh...

It's worsted-weight acrylic.

It's uh.

It's gonna be toasty as heck if I do that, and September might not be the month for a hot pocket.

That is an intentional joke.

But seriously, the acrylic is 100% final resort. Too sweaty.

My next closest idea is some wool sock yarn, and that, too, would be overwarm.

I hope this project works out, especially since I'd like to make a couple more of them...

As for tonight, it's finally down to about 78℉(25,5℃) in my room and I desperately want to lay down and vent the body heat I've accrued throughout the day lol.

Go Enjoy Something
FC

Monday, June 26, 2023

Fiber Monday

 
In Which A Breakthrough Has Been Made!

I have been agonizing for the last few weeks over what I should do about having some sort of skirt or side-guards for my Ren-Faire costume. I've tried using motifs from an umbrella design, artfully connected filet crochet, straight up lace panels, building an entire skirt from scratch, etc.

But this week I cracked the code!

Leaves.

I just want a bunch of leaves.

Well, not just a bunch of leaves, I'm not PricklyAlpaca...

I want to make thigh pouches with leaf flaps.

Why this specific combo? Well, I'm going to be wearing a very dark green tunic with some dark red embroidery, and I'll be wearing this tunic (which doesn't quite cover my back pasture as it were) with a pair of tan jeggings I've had for years.

Jeggings, especially for rotund persons such as myself, do not generally have functional pockets. I will be wandering about with friends in September and will need at least one hand free to grip my partner's hand like an excited toddler holding a juice box. The other hand will likely be occupied with any purchases and/or water. Thus I need a place to store my valuables - phone, wallet, keys, etc (I'll need my keys because they have a bottle opener on them, and if we find any fun sodas anywhere, I'd like to be prepared).

But I also want a 2nd pouch for rocks and/or other fun things I find.

So I'll need 2 leaves + 2 pouches. The pouches will be a little narrower than each leaf, but longer, and each will be probably an inch or two deep. Since the pouches themselves will (presumably) be simple rectangular shapes, I'm not going to look for a pattern for them. Also finding a pattern that would match the leaf pattern would be a pain, so yeah. Homebrew, baby.

Now, what I needed for this week was an actual leaf pattern, so I set out looking for one. I found it here, from Sylwia SzB on Ravelry and Robootkomania. I used the leftover red thread from the interminable and on-hiatus mushroom bag I was working on last year (yikes has it been that long?!), a Boye size 7 steel hook (maybe 1.75mm?! I legitimately do not know), and a lot of elbow grease and worked up my first of two leaves:

And yes, it is fairly small, all things considered.
That's a laptop keyboard, so do with that what you will.

The color is a much darker red in person, but it is what it is, when it comes to photography. There's a reason I don't call myself a photographer.

Regardless, the leaf is about the size of my tiny hand (I'm told I have very stubby hands), which means that I'd be able to shove my hand in any pouch that it flops over to shut. I'll probably add a loop to the tip of the leaf to act as a button hole.

As for the pouch itself, I'm thinking I'll use the excessive amount of white thread I have. It's easy to find and relatively affordable by comparison to the colored threads. I'd love to find a way to dye the thread dark brown, so I might look at what I have available to do a natural, non-toxic dye bath. If worst comes to it, I'll just have ridiculous white pouches. Next worst: see which watercolors will stain the thread without leaching.

Regardless, I'm looking forward to having these pouches done... because after the actual pouches themselves, I'm gonna have to figure out how to get them to stay on me. I'm reasonably sure I can figure it out before September.

Even though it's already almost July some-freaking-how.

When I finish the leaf pouches, I'll get someone to take pics of me wearing them.

Hopefully those'll get posted before the trip lol!

As for tonight, I've got a second leaf to whip up and some pouches to plan. Do I want them to be three piece patterns or five? (front+back+flap all in one with two sides or front, back+flap, two sides, and a bottom?) We'll see.

I hope everyone else's crochet plans are going well!

And I hope you all...

Go Enjoy Something!
FC

Monday, February 27, 2023

Fiber Monday

 
Y'All Ready For Some Shawl?

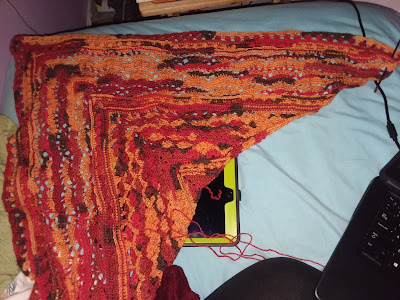
Because yeah, I worked on the shawl for a whole... hour and 26 minutes this week, bringing my efforts up to a total of 6 hours 53 minutes or so.

And it's not even halfway done.

So if I was to charge an hourly rate at my state's minimum wage ($13.80/hr), I'd have to charge over $95 for this thing just based on labor!

And this, kids, is why there's no such thing as a "fair price" for handicrafts and artwork.

But enough about that, you'll want to see the shawl!

Yup, that's my knee in the shot at the bottom left
and my laptop in the top right.

I've got quite a bit of work left to do on this shawl, and while it's one of the easiest shawls you can make, it's also incredibly slow going with a 2.75mm hook and lace weight cotton.

It's really pretty though.

I kind of wish I had another cake of the green lace from this brand so I could make another shawl in a more springy color... maybe add some cute little pink & white sakura blossoms onto it as décor...

But nay, I shall finish this sucker!

And then I shall make another project!

Who knows what that shall be. We'll find out.

Anywho, I'm gonna go brush my teeth and put a hot pack on my neck for reasons I'll explain tomorrow (they're very silly reasons). I hope all your projects are going well!

That'll do it for me tonight.

Go Enjoy Something!
FC

Tuesday, December 14, 2021

Fiber Monday(ish)

 
I Was So Busy Working On Crochet I Forgot To Write!!!

I won't get into my dumb butt's steadfast belief in overworking myself right now, but suffice it to say I have crocheted a lot this week, I just can't show you most of it.

Also, we're on to a brand new part of our very interesting Secret Project, so if you're just joining us, here's the pattern so far:

Round 1: sc 6 into magic ring (6 sc)
R2: 2sc around (12 sc)
R3: [2sc, sc] around (18 sc)
R4: [sc, 2sc, sc] (24 sc)
R5: [2sc, sc in next 3 sts] (30 sc)
R6: sc around (30 sc)
R7: [sc in next 2 sts, 2sc, sc in next 2 sts] around (36 sc)
R8: [2sc, sc in next 5 sts] around (42 sc)
R9: [sc in next 3 sts, 2sc, sc in next 3 sts] around (48 sc)
R10: [2sc, sc in next 7 sts] around (54 sts)
R11: [sc in next 4 sts, 2sc, sc in next 4 sts] around (60 sc)
R12-13: sc around (60 sc)
R14: [2sc, sc in next 9 sts] around (66 sc)
R15: [sc in next 5 sts, 2sc, sc in next 5 sts] around (72 sc)
R16: [2sc, sc in next 11 sts] around (78 sc)
R17: [sc in next 6 sts, 2sc, sc in next 6 sts] around (84 sc)
R18: [2sc, sc in next 13 sts] around (90 sc)
R19-21: sc around (90 sc)
R22: [sc in next 7 sts, 2sc, sc in next 7 sts] around (96 sc)
R23: [2sc, sc in next 15 sts] around (102 sc)
R24: [sc in next 8 sts, 2sc, sc in next 8 sts] around (108 sc)
R25: [2sc, sc in next 17 sts] around (114 sc)
R26: [sc in next 9 sts, 2sc, sc in next 9 sts] around (120 sc)
R27-30: sc around (120 sc)
R31: [2sc, sc in next 19 sts] around (126 sc)
R32: [sc in next 10 sts, 2sc, sc in next 10 sts] around (132 sc)
R33: [2sc, sc in next 21 sts] around (138 sc)
R34: [sc in next 11 sts, 2sc, sc in next 11 sts] around (144 sc)
R35: [2sc, sc in next 23 sts] around (150 sc)
R36-40: sc around (150 sc)
R41: [sc 2 together, sc 23] around (144 sc)
R42-47: sc around (144 sc)
R48: [sc 11, sc 2 together, sc 11] around (138 sc)
R49-55: sc around (138 sc)
R56: [sc 2 together, sc 21] around (132 sc)
R57-64: sc around (132sc)
R65: [sc 10, sc 2 tog, sc 10] around (126 sc)
R66-74: sc around (126 sc)
R75: [sc 2 tog, sc 19] around (120 sc)
R76-84: sc around (120 sc)
R85: sc around, sl st to first sc (120 sc)
R86: ch3 (counts as 1st dc), dc in each sc around, sl st in top of ch3 (120 sc)
R87: ch3 (counts as 1st dc), dc in next 10 dc; yarn over, insert hook into next dc, pull through 1 loop, yarn over, pull through 2 loops, yarn over, pull through 2 loops (does not count as 1st foundation dc), foundation dc next 96 stitches, then (being careful not to twist) dc in the 12th dc from the end of the round, dc to the end of the round (24 dc, 96 foundation dc = 120 dc); sl st to top of ch3, fasten off.

You should now have something that looks like a hinged ring or a handle attached to an odd, pear-shaped pouch. Now we’ll begin the underside of the lid (this is going to be weird, I’m sorry).

Form a magic ring from the same color as you’ve been using. I use a double-magic-ring for added security but you can start this in the round however you like.

R1: ch3 (counts as 1st dc here and throughout), dc 11 in ring, sl st to the top of the ch3 (12dc)
R2: ch3, fpdc in same dc, (dc in next dc, fpdc in same dc) around, sl st to top of ch3 (12dc, 12fpdc = 24st)
R3: ch3, dc in next st, fpdc in fpdc (dc in next 2 st, fpdc in fpdc) around, sl st to top of ch3 (24dc, 12fpdc = 36st)
R4: ch3, dc in next 2 sts, fpdc in fpdc (dc in next 3 sts, fpdc in fpdc) around, sl st to top of ch3 (36dc, 12fpdc = 48st)
R5: ch3, dc in next 3 sts, fpdc in fpdc (dc in next 4 sts, fpdc in fpdc) around, sl st to top of ch3 (48dc, 12fpdc = 60st)
R6: ch3, dc in next 4 sts, fpdc in fpdc (dc in next 5 sts, fpdc in fpdc) around, sl st to top of ch3 (60dc, 12fpdc = 72st)
R7: ch3, dc in next 5 sts, fpdc in fpdc (dc in next 6 sts, fpdc in fpdc) around, sl st to top of ch3 (72dc, 12fpdc = 84st)
R8: ch3, dc in next 6 sts, fpdc in fpdc (dc in next 7 sts, fpdc in fpdc) around, sl st to top of ch3 (84dc, 12fpdc = 96st)
R9: ch3, dc in next 7 sts, fpdc in fpdc (dc in next 8 sts, fpdc in fpdc) around, sl st to top of ch3 (96dc, 12fpdc = 108st)
R10: ch3, dc in next 8 sts, fpdc in fpdc (dc in next 9 sts, fpdc in fpdc) around, sl st to top of ch3 (108dc, 12fpdc = 120st)

Take your hook out of the disc you formed (which we will now refer to as the “Lid”), then choose a spot to attach it to on the weird flap/hinge part of the first piece (which we’ll now refer to as the “Body”). With the ridged pattern facing downward (towards the open mouth of the Body), insert your hook back through one stitch of the Body’s hinge/flap and back into the loop of the Lid. We will be making our stitches through the hinge/flap stitches and back into the Lid for this round.

R11: ch3 (pull the first loop all the way through the hinge/flap stitch to make your 1st ch), dc in next 9 dc going through the corresponding flap/hinge stitches as you go; on the next stitch, do not go back through the hinge/flap stitch to make your fpdc in fpdc; (dc in next 10 dc, fpdc in fpdc) around until the last fpdc, which is basically impossible (if you figure it out, great!) so just fake it til you make it; sl st in top of ch3. (120dc + 12fpdc = 132 sts)

You should have something that looks a bit like a sand dollar stuck in a ring.

R12: ch3, dc in next 10 dc, fpdc in fpdc; (dc in next 11 dc, fpdc in fpdc) around, sl st in top of ch3 (132dc + 12fpdc = 144 sts)
R13: ch3, dc in next 11 dc, fpdc in fpdc; (dc in next 12 dc, fpdc in fpdc) around, sl st in top of ch3 (144dc + 12fpdc = 156 sts)
R14: ch3, dc in next 12 dc, fpdc in fpdc; (dc in next 13 dc, fpdc in fpdc) around, sl st in top of ch3 (156dc + 12fpdc = 168sts)
R15: ch3, dc in next 13 dc, fpdc in fpdc; (dc in next 14 dc, fpdc in fpdc) around, sl st in top of ch3 (168dc + 12fpdc = 180sts)

This week:
R16: ch3, dc in next 14 dc, fpdc in fpdc; (dc in next 15 dc, fpdc in fpdc) around, sl st in top of ch3 (180dc + 12fpdc = 192sts)
R17: ch3, dc in next 15 dc, fpdc in fpdc; (dc in next 16 dc, fpdc in fpdc) around, sl st in top of ch3 (192dc + 12fpdc = 204sts)
R18: ch3, dc in next 16 dc, fpdc in fpdc; (dc in next 17 dc, fpdc in fpdc) around, sl st in top of ch3 (204dc + 12fpdc = 216sts)
R19: ch3, dc in next 17 dc, fpdc in fpdc; (dc in next 18 dc, fpdc in fpdc) around, sl st in top of ch3 (216dc + 12fpdc = 228sts)
R20: ch3, dc in next 18 dc, fpdc in fpdc; (dc in next 19 dc, fpdc in fpdc) around, sl st in top of ch3 (228dc + 12fpdc = 240sts)

And here's what I've done this week:

R21: ch3, dc in next 19 dc, fpdc in fpdc; (dc in next 20 dc, fpdc in fpdc) around, sl st in top of ch3 (240dc + 12fpdc = 252sts)
R22: ch3, dc in next 20 dc, fpdc in fpdc; (dc in next 21 dc, fpdc in fpdc) around, sl st in top of ch3 (252dc + 12fpdc = 264sts)
R23: ch3, dc in next 21 dc, fpdc in fpdc; (dc in next 22 dc, fpdc in fpdc) around, sl st in top of ch3 (264dc + 12fpdc = 276sts)
R24: ch3, dc in next 22 dc, fpdc in fpdc; (dc in next 23 dc, fpdc in fpdc) around, sl st in top of ch3 (276dc + 12fpdc = 288sts)
R25: ch3, dc in next 23 dc, fpdc in fpdc; (dc in next 24 dc, fpdc in fpdc) around, sl st in top of ch3 (288dc + 12fpdc = 300sts)

You'll have a nice big weird ribbed disc now, but we're not done yet!

It doesn't look.... great yet, I'm sure. Mine's super lumpy lol!


R26: ch3, insert hook through back loops of next dc - by this I mean the back loop usually used and there should be a very small wrapped section just below that loop that you can wiggle the hook onto. If you cannot find that, don't worry, just work in back loops only to the end of the round, otherwise, dc into both loops around, change to your second color in the end of the last dc, sl st in top of ch3 to join. (300 sts)

It's very unclear, but there is a small horizontal bar under the back loop.
I'm using that bar plus the back loop!

Another angle, but unfortunately it is blurry. Sorry!


Did you catch our color change?! We have begun the finishing touches, my friends! If you missed the color change or if you just hate doing them, don't worry, you can actually just tie off the first color and attach your second color in this first stitch of the new round!

R27: ch3, dc in next 74 dc, hdc in next dc, sc in next dc, sl st in next 146 dc, sc in next dc, hdc in next dc, dc in last 75 dc, sl st to top of ch 3 to join. (150 dc, 2 hdc, 2sc, 146 sl st = 300 sts)

The Project So Far (on my laptop lol)

As You can see, we made a bit of a gradual drop to the sl sts!
Also my beige yarn is very dirty and I'll need to wash this before I block it...

As for why we just added those slip stitches, I will explain now, but show you next week:

We're making another opening! This one is only half as wide as the project's current width (150 stitches wide, to be specific) but it's waaay wider and more open-looking than our little lid/mouth that we made on the body. We'll be building up the top after we establish the opening in this red section, and once we're done with that, we'll make some finishing touches, but we really are nearly done with this! It just... doesn't quite look like it.

Also, fair warning, you may want to get a pair of zippers that are as long as the openings we're making. You could probably hold these closed another way, but zippers will be more convenient for future use!

Any guesses so far as to what we're making?

Also, I'm going to say this here: you can customize this to any size you want, really. It just takes a bit of math and understanding how the repeated parts of the pattern work together. What I'm providing here will hopefully be a jumping off point.

And of course you can sell items you make based off of this pattern. I'd love it if you'd credit me with the pattern itself, but I can't tell you not to sell objects you made, that's silly. It's not as if this is based off of any licensed characters or anything. It's just... a mysterious project ;)

That'll about do it from me tonight! Tune in probably halfway through tomorrow when I remember that I committed to writing a blog on Tuesdays lol!

I hope you have fun working on your own projects, and...

Go Enjoy Something!
FC

Tuesday, November 30, 2021

Fiber Monday


More Progress, though slow

So I'm very sleepy and this blog is very late. I'm sorry about that, but in my defense, I haven't had a decent night's sleep in a month. Blame anything you like - it really just boils down to "sometimes I don't sleep too good and nothing I do helps". I'm sure I'm near the end of this insomnia bout, though. I tend to start sleeping better and better as the temperature outside drops and the snow accumulates!

Speaking of which, yes, we had our first snowfall on Friday! It was a light coating that has mostly just made my deck icy and the yard look like it was lightly bussed by the Snow Fairy as she headed north for the winter lol. The squirrels are furiously hunting down food and it's all very quaint and very late fall/early winter.

But you're not here for insomnia or weather reports, you want to see the next part of the pattern! Here is where we're at for the pattern so far:

Round 1: sc 6 into magic ring (6 sc)
R2: 2sc around (12 sc)
R3: [2sc, sc] around (18 sc)
R4: [sc, 2sc, sc] (24 sc)
R5: [2sc, sc in next 3 sts] (30 sc)
R6: sc around (30 sc)
R7: [sc in next 2 sts, 2sc, sc in next 2 sts] around (36 sc)
R8: [2sc, sc in next 5 sts] around (42 sc)
R9: [sc in next 3 sts, 2sc, sc in next 3 sts] around (48 sc)
R10: [2sc, sc in next 7 sts] around (54 sts)
R11: [sc in next 4 sts, 2sc, sc in next 4 sts] around (60 sc)
R12-13: sc around (60 sc)
R14: [2sc, sc in next 9 sts] around (66 sc)
R15: [sc in next 5 sts, 2sc, sc in next 5 sts] around (72 sc)
R16: [2sc, sc in next 11 sts] around (78 sc)
R17: [sc in next 6 sts, 2sc, sc in next 6 sts] around (84 sc)
R18: [2sc, sc in next 13 sts] around (90 sc)
R19-21: sc around (90 sc)
R22: [sc in next 7 sts, 2sc, sc in next 7 sts] around (96 sc)
R23: [2sc, sc in next 15 sts] around (102 sc)
R24: [sc in next 8 sts, 2sc, sc in next 8 sts] around (108 sc)
R25: [2sc, sc in next 17 sts] around (114 sc)
R26: [sc in next 9 sts, 2sc, sc in next 9 sts] around (120 sc)
R27-30: sc around (120 sc)
R31: [2sc, sc in next 19 sts] around (126 sc)
R32: [sc in next 10 sts, 2sc, sc in next 10 sts] around (132 sc)
R33: [2sc, sc in next 21 sts] around (138 sc)
R34: [sc in next 11 sts, 2sc, sc in next 11 sts] around (144 sc)
R35: [2sc, sc in next 23 sts] around (150 sc)
R36-40: sc around (150 sc)
R41: [sc 2 together, sc 23] around (144 sc)
R42-47: sc around (144 sc)
R48: [sc 11, sc 2 together, sc 11] around (138 sc)
R49-55: sc around (138 sc)
R56: [sc 2 together, sc 21] around (132 sc)
R57-64: sc around (132sc)
R65: [sc 10, sc 2 tog, sc 10] around (126 sc)
R66-74: sc around (126 sc)
R75: [sc 2 tog, sc 19] around (120 sc)
R76-84: sc around (120 sc)
R85: sc around, sl st to first sc (120 sc)
R86: ch3 (counts as 1st dc), dc in each sc around, sl st in top of ch3 (120 sc)
R87: ch3 (counts as 1st dc), dc in next 10 dc; yarn over, insert hook into next dc, pull through 1 loop, yarn over, pull through 2 loops, yarn over, pull through 2 loops (does not count as 1st foundation dc), foundation dc next 96 stitches, then (being careful not to twist) dc in the 12th dc from the end of the round, dc to the end of the round (24 dc, 96 foundation dc = 120 dc); sl st to top of ch3, fasten off.

You should now have something that looks like a hinged ring or a handle attached to an odd, pear-shaped pouch. Now we’ll begin the underside of the lid (this is going to be weird, I’m sorry).

Form a magic ring from the same color as you’ve been using. I use a double-magic-ring for added security but you can start this in the round however you like.

R1: ch3 (counts as 1st dc here and throughout), dc 11 in ring, sl st to the top of the ch3 (12dc)
R2: ch3, fpdc in same dc, (dc in next dc, fpdc in same dc) around, sl st to top of ch3 (12dc, 12fpdc = 24st)
R3: ch3, dc in next st, fpdc in fpdc (dc in next 2 st, fpdc in fpdc) around, sl st to top of ch3 (24dc, 12fpdc = 36st)
R4: ch3, dc in next 2 sts, fpdc in fpdc (dc in next 3 sts, fpdc in fpdc) around, sl st to top of ch3 (36dc, 12fpdc = 48st)
R5: ch3, dc in next 3 sts, fpdc in fpdc (dc in next 4 sts, fpdc in fpdc) around, sl st to top of ch3 (48dc, 12fpdc = 60st)
R6: ch3, dc in next 4 sts, fpdc in fpdc (dc in next 5 sts, fpdc in fpdc) around, sl st to top of ch3 (60dc, 12fpdc = 72st)
R7: ch3, dc in next 5 sts, fpdc in fpdc (dc in next 6 sts, fpdc in fpdc) around, sl st to top of ch3 (72dc, 12fpdc = 84st)
R8: ch3, dc in next 6 sts, fpdc in fpdc (dc in next 7 sts, fpdc in fpdc) around, sl st to top of ch3 (84dc, 12fpdc = 96st)
R9: ch3, dc in next 7 sts, fpdc in fpdc (dc in next 8 sts, fpdc in fpdc) around, sl st to top of ch3 (96dc, 12fpdc = 108st)
R10: ch3, dc in next 8 sts, fpdc in fpdc (dc in next 9 sts, fpdc in fpdc) around, sl st to top of ch3 (108dc, 12fpdc = 120st)

So here we are, at the start of the new pieces, and here's where it gets complicated.

Take your hook out of the disc you formed (which we will now refer to as the “Lid”), then choose a spot to attach it to on the weird flap/hinge part of the first piece (which we’ll now refer to as the “Body”). With the ridged pattern facing downward (towards the open mouth of the Body), insert your hook back through one stitch of the Body’s hinge/flap and back into the loop of the Lid. We will be making our stitches through the hinge/flap stitches and back into the Lid for this round.

R11: ch3 (pull the first loop all the way through the hinge/flap stitch to make your 1st ch), dc in next 9 dc going through the corresponding flap/hinge stitches as you go; on the next stitch, do not go back through the hinge/flap stitch to make your fpdc in fpdc; (dc in next 10 dc, fpdc in fpdc) around until the last fpdc, which is basically impossible (if you figure it out, great!) so just fake it til you make it; sl st in top of ch3. (120dc + 12fpdc = 132 sts)


You Want to put your hook through both the lid stitch & the hinge/flap stitch!


Congrats, the hardest part of the bottom of this lid is now complete and you should have something that looks a bit like a sand dollar stuck in a ring. We’re going to go back to normal chs, dcs, and fpdcs from now on!

R12: ch3, dc in next 10 dc, fpdc in fpdc; (dc in next 11 dc, fpdc in fpdc) around, sl st in top of ch3 (132dc + 12fpdc = 144 sts)
R13: ch3, dc in next 11 dc, fpdc in fpdc; (dc in next 12 dc, fpdc in fpdc) around, sl st in top of ch3 (144dc + 12fpdc = 156 sts)
R14: ch3, dc in next 12 dc, fpdc in fpdc; (dc in next 13 dc, fpdc in fpdc) around, sl st in top of ch3 (156dc + 12fpdc = 168sts)
R15: ch3, dc in next 13 dc, fpdc in fpdc; (dc in next 14 dc, fpdc in fpdc) around, sl st in top of ch3 (168dc + 12fpdc = 180sts)

Top View

Interior View (with bonus hook oopsie I'll have to fix later...)

Now, you can take this as wide or narrow as you like, when you're making one on your own. This pattern is probably gonna be immensely customizable, but for now I'm going to try to make the Lid a couple inches wider than the mouth of the Body, which could take a few rounds. Yes, it's cupping a bit weirdly in places, but that will get straightened out with time (I hope).

Please note: I am making this up as we go along.

I am not a seasoned pro at patternmaking.

I am just as clueless about what this will really look like as you are.

Though you may be getting an idea by now what this is supposed to resemble ;)

With any luck we'll be done before Christmas at least lol!

Okay, it's time for this blogger to burrow under the fluffiest of blankets and conk the heck out, because I can barely stay awake lol.

Apologies for the lack of Thursday art, I'll talk about it tomorrow!

Er.. Today?

Yeah, sleep is good. I'll get some of that...

Go Enjoy Something!
FC

Monday, November 22, 2021

Fiber Monday

 
In Which I Have Had A Bear Of A Time lol


Yes, I am late again. No I have no regrets. I have been working very hard on a way to make a ribbed bottom lid for this project that didn't involve 1) overabundant rippling, 2) single crochet ribbing like on a cuff, and/or 3) too much math.

It took... an embarrassingly long time.

Like until literally 45 minutes ago.

But here is what we have so far!

Looks kind of like a jar from this angle!

A hinge?

A closer look at the hinge/freestanding crochet.


My first... bad attempt at a lid!


The Current, Much Better Lid!

Here is the pattern from start to current:

Round 1: sc 6 into magic ring (6 sc)
R2: 2sc around (12 sc)
R3: [2sc, sc] around (18 sc)
R4: [sc, 2sc, sc] (24 sc)
R5: [2sc, sc in next 3 sts] (30 sc)
R6: sc around (30 sc)
R7: [sc in next 2 sts, 2sc, sc in next 2 sts] around (36 sc)
R8: [2sc, sc in next 5 sts] around (42 sc)
R9: [sc in next 3 sts, 2sc, sc in next 3 sts] around (48 sc)
R10: [2sc, sc in next 7 sts] around (54 sts)
R11: [sc in next 4 sts, 2sc, sc in next 4 sts] around (60 sc)
R12-13: sc around (60 sc)
R14: [2sc, sc in next 9 sts] around (66 sc)
R15: [sc in next 5 sts, 2sc, sc in next 5 sts] around (72 sc)
R16: [2sc, sc in next 11 sts] around (78 sc)
R17: [sc in next 6 sts, 2sc, sc in next 6 sts] around (84 sc)
R18: [2sc, sc in next 13 sts] around (90 sc)
R19-21: sc around (90 sc)
R22: [sc in next 7 sts, 2sc, sc in next 7 sts] around (96 sc)
R23: [2sc, sc in next 15 sts] around (102 sc)
R24: [sc in next 8 sts, 2sc, sc in next 8 sts] around (108 sc)
R25: [2sc, sc in next 17 sts] around (114 sc)
R26: [sc in next 9 sts, 2sc, sc in next 9 sts] around (120 sc)
R27-30: sc around (120 sc)
R31: [2sc, sc in next 19 sts] around (126 sc)
R32: [sc in next 10 sts, 2sc, sc in next 10 sts] around (132 sc)
R33: [2sc, sc in next 21 sts] around (138 sc)
R34: [sc in next 11 sts, 2sc, sc in next 11 sts] around (144 sc)
R35: [2sc, sc in next 23 sts] around (150 sc)
R36-40: sc around (150 sc)
R41: [sc 2 together, sc 23] around (144 sc)
R42-47: sc around (144 sc)
R48: [sc 11, sc 2 together, sc 11] around (138 sc)
R49-55: sc around (138 sc)
R56: [sc 2 together, sc 21] around (132 sc)
R57-64: sc around (132sc)
R65: [sc 10, sc 2 tog, sc 10] around (126 sc)
R66-74: sc around (126 sc)
R75: [sc 2 tog, sc 19] around (120 sc)
R76-84: sc around (120 sc)
R85: sc around, sl st to first sc (120 sc)

R86: ch3 (counts as 1st dc), dc in each sc around, sl st in top of ch3 (120 sc)
R87: ch3 (counts as 1st dc), dc in next 10 dc; yarn over, insert hook into next dc, pull through 1 loop, yarn over, pull through 2 loops, yarn over, pull through 2 loops (does not count as 1st foundation dc), foundation dc next 96 stitches, then (being careful not to twist) dc in the 12th dc from the end of the round, dc to the end of the round (24 dc, 96 foundation dc = 120 dc); sl st to top of ch3, fasten off.

You should now have something that looks like a hinged ring or a handle attached to an odd, pear-shaped pouch. Now we’ll begin the underside of the lid (this is going to be weird, I’m sorry).

Form a magic ring from the same color as you’ve been using. I use a double-magic-ring for added security but you can start this in the round however you like.

R1: ch3 (counts as 1st dc here and throughout), dc 11 in ring, sl st to the top of the ch3 (12dc)
R2: ch3, fpdc in same dc, (dc in next dc, fpdc in same dc) around, sl st to top of ch3 (12dc, 12fpdc = 24st)
R3: ch3, dc in next st, fpdc in fpdc (dc in next 2 st, fpdc in fpdc) around, sl st to top of ch3 (24dc, 12fpdc = 36st)
R4: ch3, dc in next 2 sts, fpdc in fpdc (dc in next 3 sts, fpdc in fpdc) around, sl st to top of ch3 (36dc, 12fpdc = 48st)
R5: ch3, dc in next 3 sts, fpdc in fpdc (dc in next 4 sts, fpdc in fpdc) around, sl st to top of ch3 (48dc, 12fpdc = 60st)
R6: ch3, dc in next 4 sts, fpdc in fpdc (dc in next 5 sts, fpdc in fpdc) around, sl st to top of ch3 (60dc, 12fpdc = 72st)
R7: ch3, dc in next 5 sts, fpdc in fpdc (dc in next 6 sts, fpdc in fpdc) around, sl st to top of ch3 (72dc, 12fpdc = 84st)
R8: ch3, dc in next 6 sts, fpdc in fpdc (dc in next 7 sts, fpdc in fpdc) around, sl st to top of ch3 (84dc, 12fpdc = 96st)
R9: ch3, dc in next 7 sts, fpdc in fpdc (dc in next 8 sts, fpdc in fpdc) around, sl st to top of ch3 (96dc, 12fpdc = 108st)
R10: ch3, dc in next 8 sts, fpdc in fpdc (dc in next 9 sts, fpdc in fpdc) around, sl st to top of ch3 (108dc, 12fpdc = 120st)

This takes us to the 120 stitches necessary to attach this ribbed bottom-lid to our weird hinge/handle-looking flap bit next week!

Any guesses as to what we're making yet?

I'm really looking forward to the next few bits, since they should fly along (I'm hoping I can manage the math so it's not as big an issue lol), and soon we'll be introducing a second color!!!

I mean... you could do this as a monochrome, but I don't see why you'd want to...

You may have seen my twitter grumblings earlier today about this lid, by the way. I have struggled with this thing! I had no idea how to do it and it took several tutorials for different spoked-wheel-shaped things for me to wrap my head around it. The final tutorial I followed was what gave me the actual repetitions for the spokes, and it's the Knit-A-Square Wheel Spoke Square pattern! I just extrapolated what a bigger center for that square would look like and made the whole lid be that basic pattern!

That being said, I totally frogged that stupid lid about 30 times before I found that pattern and I was just about emotionally finished with this project lol. Thankfully it worked the way I wanted it to, and we'll continue next week!

Good luck out there everyone, and - 

Go Enjoy Something!!!
FC

Monday, October 25, 2021

Fiber Monday


In Which I Did A Lot Of Crochet!


No joke, I started working on today's blog notes at 9AM. It's been over 12 hours since then and I'm only just now getting the words into the blog itself lol!

It's been a gray and grotty day here - raining and in the low 50s - so I just sat upstairs, slowly expanding my projects!

First up we have the Mystery Project!


Behold, the mystery project in all its glory.

You'd literally never know I've done 11 rounds since last time...

Round 1: sc 6 into magic ring (6 sc)
R2: 2sc around (12 sc)
R3: [2sc, sc] around (18 sc)
R4: [sc, 2sc, sc] (24 sc)
R5: [2sc, sc in next 3 sts] (30 sc)
R6: sc around (30 sc)
R7: [sc in next 2 sts, 2sc, sc in next 2 sts] around (36 sc)
R8: [2sc, sc in next 5 sts] around (42 sc)
R9: [sc in next 3 sts, 2sc, sc in next 3 sts] around (48 sc)
R10: [2sc, sc in next 7 sts] around (54 sts)
R11: [sc in next 4 sts, 2sc, sc in next 4 sts] around (60 sc)
R12-13: sc around (60 sc)
R14: [2sc, sc in next 9 sts] around (66 sc)
R15: [sc in next 5 sts, 2sc, sc in next 5 sts] around (72 sc)
R16: [2sc, sc in next 11 sts] around (78 sc)
R17: [sc in next 6 sts, 2sc, sc in next 6 sts] around (84 sc)
R18: [2sc, sc in next 13 sts] around (90 sc)
R19-21: sc around (90 sc)
R22: [sc in next 7 sts, 2sc, sc in next 7 sts] around (96 sc)
R23: [2sc, sc in next 15 sts] around (102 sc)
R24: [sc in next 8 sts, 2sc, sc in next 8 sts] around (108 sc)
R25: [2sc, sc in next 17 sts] around (114 sc)
R26: [sc in next 9 sts, 2sc, sc in next 9 sts] around (120 sc)
R27-30: sc around (120 sc)
R31: [2sc, sc in next 19 sts] around (126 sc)
R32: [sc in next 10 sts, 2sc, sc in next 10 sts] around (132 sc)
R33: [2sc, sc in next 21 sts] around (138 sc)
R34: [sc in next 11 sts, 2sc, sc in next 11 sts] around (144 sc)
R35: [2sc, sc in next 23 sts] around (150 sc)
R36-40: sc around (150 sc)
R41: [sc 2 together, sc 23] around (144 sc)
R42-47: sc around (144 sc)
R48: [sc 11, sc 2 together, sc 11] around (138 sc)
R49-55: sc around (138 sc)

This week I finished up Rounds 53-55 and worked on rounds 56-64!

R56: [sc 2 together, sc 21] around (132 sc)
R57-64: sc around (132sc)


I know it's hard to tell, even after 5 or 6 weeks of work, what this will be, but we're getting there, I promise!


Now onto the other project - my delightful Magnificent Marge Shawl:

They're not kidding about the magnificent part...


This bulky baby is now as long as a twin bed is wide! That's an iPad under the center, and yes, that's my knee and laptop as well...
Loooooook at it! It's huge! And textured!

Literally my only concerns right now are the weight (wool is heavy), the texture (wool is scratchy), and how much wool I have left (uh... not much). This sock wool is probably discontinued, if I could even find it to begin with. I'm pretty sure this is a Jawool brand? But I bought it back in like 2014 so who even knows any more, right?!

Anywho, this shawl could probably stop growing right now and still be a very functional shawl, but I want to see how far I can push it (because of course I do). If you have any idea what this yarn is, feel free to tell me in the comments!

I should be back on Thursday with 3/4 of my Big Big Art Project 2021, but we'll see :P

Go Enjoy Something!
FC