 |
| In Which We Are Done Snowing! |
It's been a long month, but the snowflakes are all completed!!!
 |
| The Entire Snowstorm pre-ironing |
 |
| post ironing and starching |
 |
| Some details |
 |
| Some took their blocking really well! |
 |
| In fact, I'd be tempted to say that these are some of my best work yet! |
 |
| Some of them are very loopy |
 |
| And I cannot get over the crisp lines on some of these! |
Since today's pics are of flakes you've already heard me talk about in the last 3 weeks, I also wanted to show you guys something you can make in a day!
 |
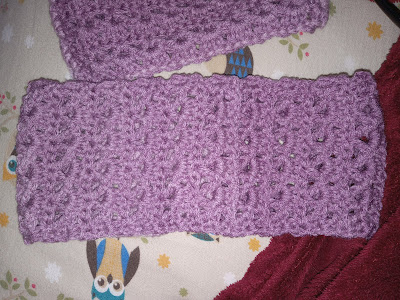
| The Lilac Set - purse (top) and headband (bottom) |
These were made with an H (5mm) hook and worsted weight yarn using an alternating granny block/v-stitch pattern.
Basically, the headband is a long rectangle of repeated rows of 3x blocks and v-stitches, sewn together at the ends. If you want it to be twisted, then you just twist it before sewing the ends.
The purse, meanwhile, is a wider base of the same pattern repeats. Go until you've got the height of the front of the purse, then do your next row in the back loops only of the stitches to make a fold point. Finish the same amount of rows you just did, then do another row in either the back or front loops (whichever would make your piece flop over on itself) to form the top flap. When you've got a few rows done, switch to single crochet, but instead of turning at the end of the row, turn the work and start working in the side of the crochet - we're both edging the piece and stitching it shut! Fold your purse shut, then single crochet all the way down one side, slip stitch along the bottom, and single crochet back up the other side. When you get to the start of the first round of single crochet, slip stitch, then chain one. Single crochet almost halfway across the flap, chain two to form a button hole, then finish chaining the row. Slip stitch your way down the side until you reach the opening, then slip stitch around the opening and up the other side of the purse. When you reach the top, slip stitch, chain one, and then single crochet all the way across, including the button hole, and slip stitching once into the first slip stitch of the previous round. Tie off, weave in your ends.
 |
| It is wide so it can cover more surface earea. That's not a typo. |
The purse, meanwhile, is a wider base of the same pattern repeats. Go until you've got the height of the front of the purse, then do your next row in the back loops only of the stitches to make a fold point. Finish the same amount of rows you just did, then do another row in either the back or front loops (whichever would make your piece flop over on itself) to form the top flap. When you've got a few rows done, switch to single crochet, but instead of turning at the end of the row, turn the work and start working in the side of the crochet - we're both edging the piece and stitching it shut! Fold your purse shut, then single crochet all the way down one side, slip stitch along the bottom, and single crochet back up the other side. When you get to the start of the first round of single crochet, slip stitch, then chain one. Single crochet almost halfway across the flap, chain two to form a button hole, then finish chaining the row. Slip stitch your way down the side until you reach the opening, then slip stitch around the opening and up the other side of the purse. When you reach the top, slip stitch, chain one, and then single crochet all the way across, including the button hole, and slip stitching once into the first slip stitch of the previous round. Tie off, weave in your ends.
After you've got the body of the purse, you can think about making a strap for it (and a button in my case). To make a strap, I just made a chain of 4ch, then hdc in the second ch from the hook and hdc across, turn, ch1, repeat rows of hdc until it's long enough, then sew to the top of the bag.
To make a button, find some sturdy yarn and use a much, much smaller hook than you think you need. I used a C/2.75mm hook for my button. From there it's just making a magic circle, sc6 into the circle, tighten the ring, sl st to the first st, ch1, 2sc around (12sc). Then you tie it off, sewing the long tail until it gets back to the center of the ring and use that to sew it into place!
 |
| Sometimes my new phone likes to switch between horizontal & vertical shots and I haven't quite learned how to change its mind on those... |
So that's this week's crochet work! I'm still trying to finish up my projects, but I think it'll go pretty well from here.
How are all your guys' craft projects going? Get anything fun done lately?
That'll do it from me - gotta finish making stuff lol!
Go Enjoy Something!
FC
No comments:
Post a Comment
Comments are now moderated, so if your comment doesn't appear right off, it's just bc I haven't seen the email yet sorry!